Pages

Friday, September 30, 2011

Decopauge Pumpkins

Autumn is here!!! And that means it's time to decorate for the fall. I started my first fall project today. Decopauge Pumpkins. I've never made these before but I saw them in the Country Living Magazine and I decided to attempt this project.

This is what I call inspiration!

I first went to a local farm to pick out the perfect pumpkins. I felt good about supporting the local farms! When I got home I wiped down the pumpkins to make sure they were clean and dry. Then I set up an area to work in, grabbed a paint brush and some white paint. (Technically you could just use a white pumpkin and skip the whole painting process but I didn't like any of the white pumpkins that I saw.) I placed a piece of plywood underneath the pumpkins to protect the floor.
Then I began painting!

I began by painting the top half of the pumpkin because that was the easiest portion to begin with. I should have waited for it to dry before begining the bottom half of the pumpkin but what can I say, I'm so inpatient. I held the pumpkin by the stem to paint the bottom portion of the pumpkin. To do this you have to slowly turn the pumpkin. Try not to pull at the stem too much because you take the risk of ripping the stem off.

As I mentioned beforeI was inpatient about painting the pumpkin and you can see why I now think its a good idea to let the paint dry. You end up with blotch marks from rolling the pumpkin and painting at the same time.
It really doesn't matter though if you plan on putting a second coat onto the pumpkin. After I put my second coat of paint of the pumpkins I left them to dry..... overnight. I figured the outcome is better if you are patient.

While I let the pumpkins dry I picked out patterns from the internet that I would like to decopauge onto the pumpkins. I then made copies of the prints I chose so that I would have enough paper to cover the whole pumpkin. You can get copies done at either your local staples or just print extra from your computer.

I let the pumpkins dry overnight and then the next day I began decopauging them with Mod Podge. I cut the patterns into strips of paper that could go from the top of the pumpkin to the base of the pumplin.

I also poured a good amount of the mod podge into a bowl.

Dip the pattern strip into the mod podge making sure to cover the paper with a generous amount.

Then apply it to the pumpkin smoothing out any ripples with your hands. Be prepared to have messy hands!


Don't worry, a little soap and water does the trick when you've finished with the project. Once your done covering the pumpkins let them sit to dry.


I took some before and after pictures so that you can see what the results will look like.

                      
                                              Before                                                    After

Tomorrow once the pumpkins are dry I will add new pictures of what they look like. Right now the decopauge hasn't completely dried which is noticeable around the stem of the pumpkin. By tomorrow the white near the stems will turn to clear.

Wednesday, September 28, 2011

More Magnets

My favorite thing to do is GOOGLE. I google everything. So the other day I googled bottle cap magnets in reference to the bottle cap magnets that I previously posted about. I found a new type of bottle cap magnet and was inspired to try making them.

Supplies:

Bottle Caps
Designed Paper / Magazine
Mod Podge
Paint Brush
Clear Nail Polish
Glue Gun
Magnet

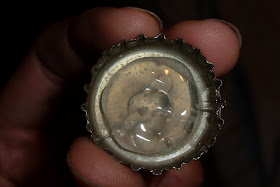
I begin by looking through magazines for pretty patterns. Some of my scrap book papers also have pretty designs. I then cut out a small circle (1" in Diameter) that can fit into the bottle cap. You can also use a 1" hole punch but I didn't have one.


Then I brush some of the mod podge into the bottle caps, placed the small patterned paper circles into the caps, and then applied a light coat of mod podge to the surface of the paper.


Let the mod podge sit for about 5 minutes until its dry. I was told to use epoxy resin but this was unsuccessful for me. The epoxy resin had a lot of air bubbles in it and it also had a yellowish tint to it. As an alternative I decided to use clear nail polish. Hey if it works on your nails then it should work well for this project too. You might want to consider using a clear gloss paint found at a hardware store if you decide to do this project in bulk.

Let the nail polish dry for 24 hours before trying to add the magnets.

After the polish dries use a glue gun to apply the small round magnets to the back of the bottle caps.

Then apply to your fridge or locker!

Sunday, September 25, 2011

Chocolate Dipped Pretzel Rods

I wanted to make something else for the bake sale at work so I decided that I would make chocolate dipped pretzel rods. This is a fun easy project that can be used for desserts, party favors or an item at a bake sale.

Supplies:
Pretzel Rods
Chocolate Wafers (You can get these in all sorts of colors at AC Moor and they are fairly inexpensive)
Sprinkles
Treat Bags
Twist Ties
Ribbon
Scissors
Wax Paper
Tall Coffee Mug
Cookie Tray


When I started this project I had all of the supplies except the wax paper. You can use foil instead if you don't have wax paper on hand. I also didn't have any twist ties so at the end when I was tying up the treat bags I made sure to tie it very tight so that the pretzels wouldn't go stale.


Begin by filling a tall coffee mug with chocolate wafers and microwave for about 30 seconds. After 30 seconds stir the chocolate to loosen it up. Then put it back in the microwave for another 30 seconds repeating this process until the chocolate is completely melted. Make sure you follow the directions on the chocolate wafer bag. If you microwave the chocolate too long it becomes very chalky rather than liquidy. Be careful because the coffee mug will get very hot. Make sure you use an oven mit. Later you will be thanking me for suggesting that you use a tall coffee mug because it is the perfect depth for making chocolate dipped pretzel rods.

Next, dip the pretzel rod into the melted chocolate but not covering the entire rod. After dipping the pretzel in chocolate you can lay it on a wax covered (or foil covered in my case) cookie sheet.


Add the sprinkles to the pretzels as soon as possible otherwise they will not stick to the choocolate if it is dry. As an alternative for decorating the pretzels you can drizzle a contrasting colored chocolate onto the pretzel.

Depending on the weather outside you can leave the chocolate dipped pretzels out and once the chocolate cools it will harden within a half an hour. When I made these chocolates it was very humid and muggy so to speed up the process I put the pretzels on a shelf in the fridge for 5 minutes.


 At the very end I put two pretzels in each treat bag, tied them with a twist tie and ribbon and then curled the ribbon.

Then I put them on display in a basket for whatever event I am using them for.  (If I don't plan on using them that day I put them in the fridge so the chocolate doesn't melt.) This makes a very delicious and creative snack.

Saturday, September 24, 2011

Cocoa Cones

Yeah, so this blogging thing isn't that easy. Not that I expected it to be, but it takes a lot of time! And if you have nothing to talk about then forget about it! On day 10 of my blog I was ready to quit because I thought that I didn't really have anything important to say. But its not about that. Its about doing what you love and loving what your doing. I love art and to motivate myself to do more then I need this blog. It can be kind of an artistic diary for me. I also realized that I do this with everything. I quit half way. I get bored and move on to something new. That's when I decided to keep my blog and if I meet someone in passing and they have the same interests as me then I can refer them to it. Plus it gives me something to do while Johnny plays video games. Which is exactly what he is doing right now! And with the winter months coming just around the corner it gives me something to do when I am snowed in.

Its interesting to look at the statistics side of blogging.I started my blog exactly 16 days ago. September 9th was when I posted my first post. And since then it has gotten 133 views. That's about a whopping 8 views a day.... and no they are not my own views! It's really not a lot but seeing that I am new at this and haven't told many people about it, it's kind of exciting! Someone from Russia has viewed this blog twice and we also have a reader from Germany! 65% of the audience uses Internet Explorer, 31% uses safari and 1% uses Opera. This blog has so far been accessed from an ipad, an iphone, and a blackberry - and for the record I don't own any of those! So thank you to all of you who have listened to me write about what's important to me.

 Hopefully I have been able to share a few good tips with you. I know so far I haven't posted a lot. 14 to be exact (almost once a day). I'm not trying to make excuses but its hard when you work full time, and go to school! Enough of me blabbing about nothing. I'd like to share with you a new project. I actually started this one for a bake sale that we are having at work. Its perfect for the winter months as a little gift or even a party favor. Cocoa Cones!

The supplies that you will need for the cocoa cone include:

Powder Cocoa Mix
Mini Marshmallows
Disposable frosting bags
Ribbon
Scissors

I usually take a tall glass and put the disposable frosting bag in it to stand it up.

I then add the powder cocoa mix. Usually about 2 servings. You can find the serving sizes on the side of your cocoa container.


Once I pour the cocoa in I then take a paper towel or clean unused paint brush and brush the excess cocoa of the sides of the plastic disposable frosting bag. The cocoa tends to stick because of the static. If you just leave it there it will be obvious against the white marshmallows. Once I am done cleaning the sides of the bag I add the mini marshmallows.

The easiest thing to do next is to seal the bag with a twist tie. Unfortunately I didn't have any today so I just tied it with ribbon. Some alternative ideas to do here is to use colored marshmallows or add chocolate chips or some other candy to jazz it up a bit. Since these are just for a bake sale I tried to keep it as priceless as possible with hopes to make a profit off of it for the bake sale which benefits the resident counsel at our nursing home. After you seal the bag with a twist tie, add some ribbon (and curl it) or add a beautiful bow that will make it look really elegent. You can also add a hot cocoa recipe to it or attach a tag that says thank you if you are making it as a party favor.


This is what your final product should look like - or even better if you added extra candy toppings or a pretty bow.

Sea Shell Mirror Update - I have ran into a bit of a glitch with the seashell mirror. I ran out of shells! The good news is that my in-laws are going to Maine next weekend and promised to bring home some more shells!

Sunday, September 18, 2011

Bottle Cap Magnets

Are you in need of magnets to hang pictures on your fridge, locker or in your dorm? This is a quick and inexpensive idea for a unique set of magnets.

Materials Need:
Bottle Caps
Glue Gun
Glue Sticks
Round Magnets (you can purchase a 6 pack of magnets at staples for about $3.00)


Generously fill the inside of the bottle cap with hot glue.


While the glue is still hot place the magnet into the glue. It doesn't matter which side because both sides are magnetic and will stick to your fridge.

Let the glue cool for a minute and then place on your fridge, or your locker!

Seashell Mirror Update

A lot has happened in the past few days! Johnny and I have been looking at homes for over a year now...... and we finally put a bid on one! We are just patiently waiting to hear back to see if our bid has been accepted. I am really excited and I hope we get this home. We wanted something that is in liveable conditions, and also in a decent neighborhood. We also wanted one that needed some work so we can use a little bit of our talents to fix and decorate! In the mean time I didn't want any of you to think that I have forgotten about the seashell mirror so here is the progress!

I began by making a border around the entire frame with small moonshells.  Then I lined the moonshells with tiny orange rocks that I collected from the beach. Unfortunately I ran out of small shells for the border - that means sometime soon I will have to make a trip out to the beach! After working on the border I randomly attached the larger shells to various areas on the frame. I did all of this with a glue gun.

It doesn't look like much now but I know when the frame is complete it will be beautiful. As for right now my next step will be to fill in all the gaps with smaller shells until the frame is complete! Then I have to buy a mirror that will fit in the frame.

Thursday, September 15, 2011

Framed Sand Dollars

What would you do with 89 sand dollars if you had them? I'm not sure - but its seems a little greedy to take 89 sand dollars from the beach and not use them. I decided to do a quick 5 minute project to use some of the sand dollars that I found back in March.
What you will need:
Tape
Construction Paper
Scissors
Picture Frame
Sand Dollars
Glue Gun


Tape the Construction Paper onto the back of the mat board. You may have to cut it to fit.


Shake the sand dollar to get all the sand out of it. Once it is clean apply hot glue to the back of it.


Place the sand dollar on the construction paper. I decided to center mine. Don't press to hard on the sand dollar because they are very fragile and you could break it. Then you'd have to start all over again! If you wanted to you could choose to bleach the sand dollar before framing it to make it a pure white. If you do decide to do that make sure you let it air dry before putting it onto the construction paper. The next step after glueing the sand dollar onto the construction paper is to put the frame together.
TADA!

I decided to make two for my walls. I like this one a lot because it shows the different sizes and colors that you can find a sand dollar in.

Wednesday, September 14, 2011

iH3ART

It's been nearly a week since I started this blog and I haven't even posted anything about my art! For those of you who don't understand my blog name it stands for I heart art. Which I do. I really love art. I just wanted to share some of my pieces with you. Now that I have a blog of my own, the next time I create a piece I will document it step by step and try to show you how to do it.

This piece I created in high school. It was actually the first time I realized that I could actually learn how to paint. This one was done with acrylics, which I find are easiest to work with. Each student in class was required to recreate a painting from a famous artist. I chose this skyscraper painted by Georgia Okeeffe. Below you will find a picture of the real piece.
It may not look exactly the same.... but this is what got me started.

This next one is also a recreation of another artists work. I made it to decorate my room. I always wanted to visit the canals in Italy.

This is a fun piece that I made out of cut out colored cardstock.


This was a project that was done completely in pen and ink. It helped the class to pay attention to the textures found in everyday objects.
This one isn't my favorite but Johnny loves it. The origional picture was from an ad that I found in a magazine. It was a little more difficult than the other paintings that I did because I used oil paints rather than acrylic. Oil paintings definitly take a lot longer to dry!


 I created this picture in photoshop. I'm not sure why but I have always loved it!
This painting is an example of a monochromatic still life. I brought in some objects from home that had meaning to me. I brought the suitcase in to represent my desire to travel. I borrowed the globe from another class room for the same reason. I created a little window on the globe to show one place that I would really love to visit - Greece. Hopefully I will get there someday! The teddy bear was a gift that my brother gave me and the umbrella was a decoration thatI grabbed from my room. I really enjoyed this project because I learned how to work in different dimensions and I also was able to learn about the different hues that can be found in one color!

This is one of my favorites. It is done entirely with sharpie. I made this after I read the book Briar Rose. If you ever get to read it you will see the symbolism found within this picture.

This is the Goat Island Lighthouse in Maine. I made this painting for my mother in law after we saw a piece by Frederic Kohli at the Big E that she liked. I tried to copy his style of painting and also create some sentiment by painting a lighthouse that my mother in law was familiar with. Below is an image of the origional picture of the lighthouse and also an example of a piece by Frederic Kohli.


This picture is an altered image of my younger brother that I painted!

A few of my pieces are unfinished. And honestly its possible that they will stay that way. Hopefully I will find the motivation to complete them.
The is the start of a recreation of an piece of art done by Edward Hopper called Chop Suey.


As you can see it needs a lot of work before it can be considered complete.

This is another recreation that I started. The origional is by Klimpt. Its called Mother and Child. I changed the picture a little by making the mother a brunette - like me (and my aunt and many other women)! I started this for my aunt who was pregnant but I am sad to say that its incomplete and my Aunt's baby is now 6 months old! Where did my motivation go?
This is the origional by Klimpt. I have a long ways to go until completetion.

I hope you enjoyed some of my artwork. I will post more as soon as I make it and hopefully I give a little insight on how to paint or draw!